
This installation guide offers examples of amplifier installation types and suggested system layouts. The installation of your amplifier will depend on the make and body style of your vehicle, as well as the equipment you purchased.
You can also download a pdf version of this Car Amplifier Installation Guide.
Some notes about wiring:
In addition to installation tools, your amp installation will require power and ground wiring, RCA cables, speaker wires, and a remote turn-on lead. The easiest way to get these items is in an amplifier wiring kit (available at Crutchfield). Don't forget speaker wires — they're not included in most kits. Make sure you have everything before you begin. It's also a good idea to measure distances from the amp location to the battery and receiver, so you know what lengths of wire to get.
Power and ground cable sizes
In order to operate correctly, an amplifier needs its power and ground wiring to be large enough to accommodate its demand for electrical current. What gauge (thickness) of wire to use for power cabling depends on how much current your system will try to consume, and on how long the wiring run will be. Your amp's instructions will include a recommendation on what size wire to use. Or, you can check out How to determine the best size wire for help doing it yourself.
Fuse size
An in-line fuse on the main power cable within six inches or so of the battery connection is essential for protecting the wire, your car, and you from a catastrophic fire in the event of a short circuit. Each wire manufacturer rates their wire's current capacity differently, but as a general rule, for a typical 16- to 20-foot run, you'll be safe using a:
- 25-amp fuse with 10-gauge wiring
- 60-amp fuse with 8-gauge wiring
- 100-amp fuse with 4-gauge wiring
- 250-amp fuse with 1/0-gauge wiring
Speaker wire size
When running new speaker wires from an amplifier to speakers, any size wire from 18- to 14-gauge will work fine. (The lower the gauge number, the thicker the wire.) For subwoofers, use 16- to 12-gauge wires.
Plan the location:
Choosing the location for your amplifier according to these guidelines will help your installation go smoothly:
- The amp should be at least three feet from the receiver to avoid noise radiated from the vehicle's electrical system. The amp can also interfere with the receiver's AM/FM reception.
- Do not bolt your amplifier directly to your car's metal chassis — that's inviting noise problems, like ground loops which hum or buzz. You could use rubber grommets around the mounting screws to isolate the case. Or you could mount the amp on a wooden board and attach that to the car body.
- An amp produces some heat during operation, which its heatsink absorbs and radiates, so it needs a few inches of air space around it to stay as cool as possible. When mounting an amp on a side wall, make sure the fins on the heatsink are vertical. Never mount an amp upside down, as dissipated heat will radiate back into the amp.
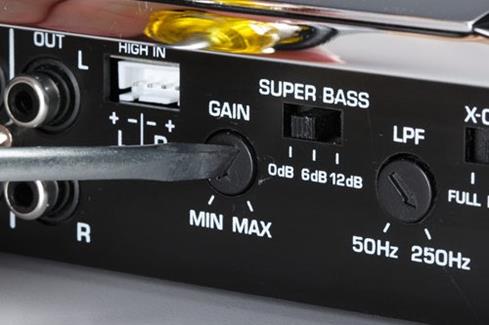
- There must be enough room on either side to make the wiring connections and adjust the controls (gain, crossover, bass boost, etc.).
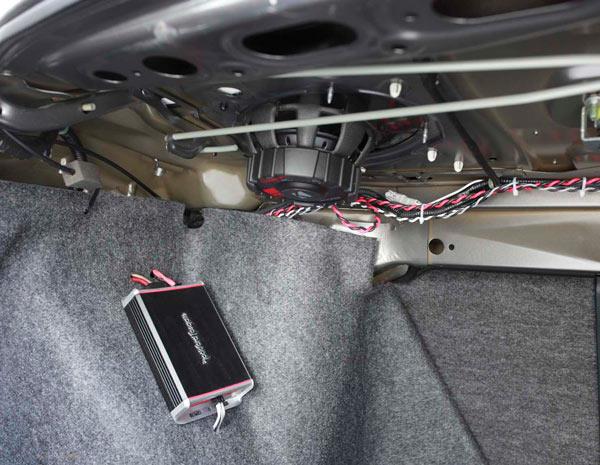 A compact subwoofer amplifier mounted in an out-of-the-way nook in a trunk with plenty of air space for cooling
Good locations include:
- On the firewall (passenger side).
Pros: You can use short wires and patch cords. You won't have to remove a seat or climb into the trunk.
Cons: Only very small amps fit here. Close to some common noise sources. - In the trunk or hatch area.
Pros: Plenty of room for large amps. Near the rear speakers.
Cons: You sacrifice some cargo space. Longer wires and patch cords are required. - Under a seat.
Pros: Closer to the receiver, so you can use shorter patch cables and signal cables, which are less prone to noise and signal degradation. Closer to the front speakers, so running wire to them will be easier. No cargo space sacrificed.
Cons: You may have to remove the seat to do the installation. Warning: removing your seat could deactivate your vehicle's SRS system. Larger amps might not fit. You may need to elevate the amp, on a piece of wood for instance, to avoid contact with water from rain or snow brought in on shoes.
IMPORTANT:
Follow the manufacturer's recommendations for mounting the amp and make sure it's secure. An amp that isn't secure could break loose in an accident and injure a passenger as it flies through the vehicle.
Routing wires for components and power connections.
Determine desired locations for each component. Use the most direct route for wires. Remove panels necessary to route and conceal wires. Test system before re-installing panels.
All system wiring should be concealed for safety, and to give your installation a nice, finished look. Wires should be secured so that they do not interfere with safe vehicle operation. Depending on the vehicle and the location you choose for your amplifier, the wiring for your system may need to be run under the dash, door scuff plate, pillar trimpanel, or kickpanel. The instructions below address, in general, what panels may need to be removed and how they typically come off. Often, panels can be pried up at edges. Screws and retaining clips might also be present that will require removal (Figure 1). To prevent damage, always use care when removing panels — a panel tool is helpful.
 Screws and retaining clips might be present that will require removal
Door scuff plate removal
The plates are usually removed by prying up the edges to release clips. Some vehicles will have screws present which will need to be removed (Figure 2).

Seat belt removal
A seat belt may be located on a panel that needs to be removed. Most seat belt anchor covers pry off. The seat belt anchor is secured with a large nut or bolt (Figure 3).

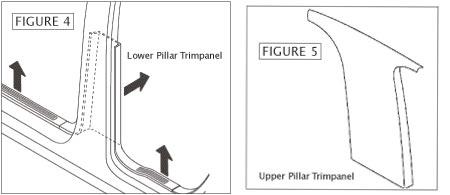
Pillar trimpanel removal
Remove seat belt if present. Remove screw covers, screws, and plastic retaining clips if present. Pry up edges of panel to remove (Figures 4 & 5).
Kickpanel removal
Look for screws and pry-out retaining clips to remove. Pry out edges of panel to release and remove (Figure 6).

Routing wire behind the dash
Route wire behind the dash and secure it with plastic wire ties. Be sure that the wire doesn't interfere with any moving parts to ensure safe operation of vehicle.
Making the power connections
1. Set the parking brake and disconnect the negative terminal from your battery to prevent any electrical short.
 Route the power wire from your amp wiring kit through a hole in your vehicle's firewall, using a grommet or bushing to prevent the insullation from scraping against metal.
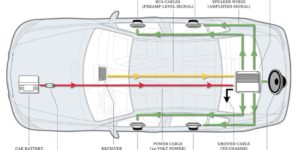
2. The power wire from your amp wiring kit (usually 16-20 feet in length) needs to run from the battery, through your car's firewall, through the car's body, usually down the driver's side, and on to the amp. Find a grommet in the firewall that already has wires or cables passing through it, and which has enough room for the power wire to fit through too. If you can't find one, you'll have to drill a hole through the firewall. Make sure you don't drill into any electrical or gas lines — check both sides of the firewall. Use a grommet to protect your wire from fraying and shorting as it passes through the hole.
3. The power wire from your amp wiring kit may have a fuse holder installed. If so, go to step 4. If not, find a good spot close to your battery to place your fuse-holder (included in the kit) — less than 6" from the battery is best. Be aware: even after a fuse blows, the short stretch of cable between the battery and the fuse holder will still be live and a potential fire hazard in the event of an accident. Anchor the fuse holder to a suitable spot with a screw or cable tie, so it won't hang loose or bounce around.
Cut a short piece off the end of the power wire (to cover the distance from the battery to the fuse holder location), and strip the insulation off both ends with a wire stripper. Crimp the terminal ring (included in the kit) onto one end of the short piece of wire, and attach the fuse holder onto the other end. Strip the insulation off the end of the power wire that leads into the passenger compartment, and connect it to the other end of the fuse holder.
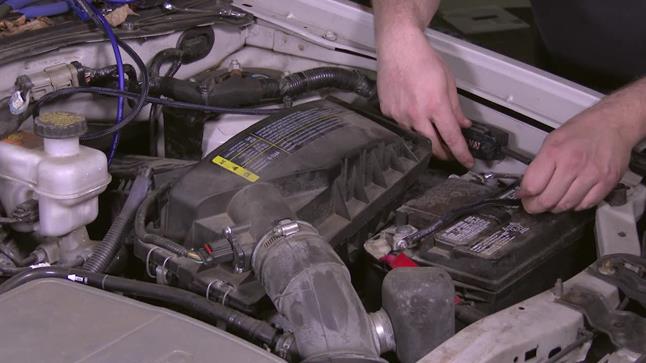 Fuse installed on power wire, and secured in engine compartment near the battery.
4. Attach the power cable to the positive battery terminal (not directly to the battery post itself). For top-mounted battery posts, the most common way to do this is to crimp a ring terminal onto the end of the power cable (many cables in wiring kits come with it already attached). Remove the battery terminal's nut, slip the power cable's ring over the bolt that secures the battery terminal to the battery post, and replace the nut. For GM vehicles with a side-mount post, we offer terminal adapters that work nicely.
A wire loom provides added protection for your wire against the high heat inside the engine compartment. If your kit includes a wire loom, thread it over the power cable until it reaches the firewall and cut to fit. Thread another piece over the short power wire running from the fuse holder to the battery.
The remote turn-on lead
5. Remove the radio from the dash to access the turn-on wire (usually a blue and white wire). The turn-on wire will "tell" your amplifier to turn on whenever the receiver is powered up (usually, whenever the vehicle is turned on). For step-by-step instructions on removing your vehicle's radio, see your vehicle-specific Crutchfield MasterSheet™, or read our In-Dash Receiver Installation Guide.
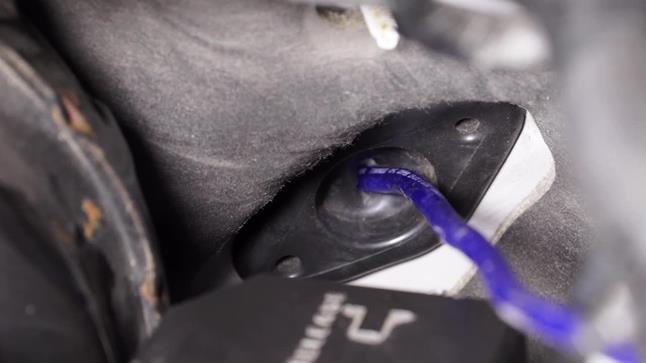
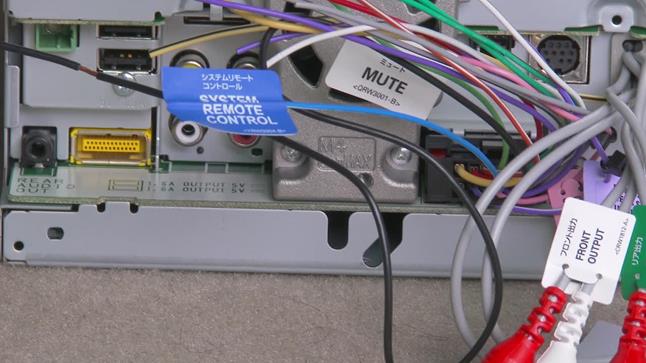 Locate the remote turn-on lead behind your radio (usually a blue and white wire), and connect the turn-on lead from your amplifier wiring kit to it.
Strip the insulation off a small section of this wire coming from the radio and the turn-on lead that came with your wiring kit and solder them together. Or, you could use crimp connectors and a crimp tool, or a Posi-Connector to connect them together. Wrap the solder or crimp connection with electrical tape (or use heat shrink tubing) to guard against a short.
The turn-on signal is +12 volts DC. If, like a factory radio, your radio doesn't have a remote turn-on output, then you can get the turn-on signal from your vehicle's fuse box. Because of its low current demand, you can connect your turn-on lead to almost any fused output terminal, like the one for the radio itself for instance, as long as it only powers up when the vehicle's on.
You'll need to route the turn-on lead to your amplifier through the car's body — it's often easiest to route the turn-on wire with the RCA cables (next step) but you can also route it with the power wire after it passes through the firewall. The power and RCA cables should run on opposite sides of the vehicle, to reduce noise — but it won't matter for the turn-on lead's low current.
Making the signal connections
6. If your in-dash receiver has preamp (RCA) outputs, connect your RCA patch cables to them. Route the patch cables to the opposite side of the vehicle from the power cable. It's important to separate the patch cables from the power wires as much as possible to avoid potential noise problems. Now you can partially re-install the radio in the dash (don't push it all the way in, in case you need to fix a problem later).
If you're using a factory radio with no RCA outputs, you can get your amplifier's input signals from the factory speaker wiring. The speakers will be getting their signal from the new amplifier — which leaves the radio's outputs available to use for the amp's inputs. There are two ways to do this: get a line output converter (LOC) that'll adjust the speaker-level signal for your amp's input, or get an amplifier with speaker-level inputs. You cut the factory speaker wires, either behind the radio or at the speakers, and connect the wires coming from the radio to your LOC or amp's inputs.
Ground: the most important connection of all
7. As near to the amplifier's location as possible, find a bolt to your vehicle's metal frame to use for ground. If you can't find a convenient ground screw or bolt, drill a hole for one — be careful not to drill into any wiring, the gas tank, or a gas or brake line. Crimp a ring terminal (usually included with the amp kit) to the short piece of ground cable (also in the kit).
Scrape away any paint and clean the bolt location thoroughly, and then bolt the terminal tightly to the vehicle's metal chassis. Use a lock washer, a star washer, extra screws, and any other technique or device that'll keep this connection tight, clean, and electrically conducting. Many people even coat the final connection with silicone caulk to prevent corrosion.
Improper or loose grounding is the #1 cause of amplifier problems.
 Scrape the paint away from the contact point so the ground connection will be bare metal to bare metal.
Amplifier mounting and connections
8. After routing the power and signal cables to your chosen location, using the techniques described previously, mount your amplifier in place. Neatly drape or trim each wire and connect it into its position, making gentle curves with wires when necessary, not sharp bends that could pinch. Many people cut small slits in their vehicle's carpeting and run their wires underneath, for stealthy installations that look factory-neat. A wiring snake comes in handy for this. Tape your wires to the snake, fish it under and through to where you want your wires to go, and pull them on through.
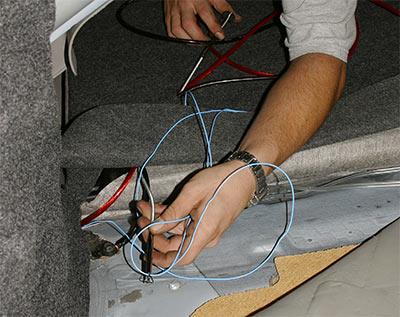 A wiring snake can come in handy for pulling wires to the amp mounting location.
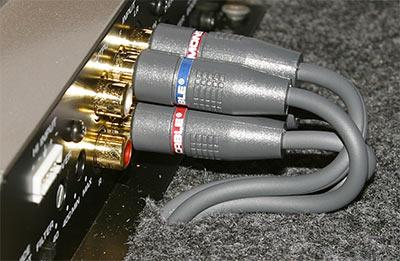 RCA cables routed through slits in the vehicle's carpet, and connected to the amplifier's signal inputs.
Speaker wiring
9. Now you have to provide a way for the music to get from your new amp to the speakers. The best way to do that is to run a new speaker wire from each amplifier output to each speaker. Use 14- or 16-gauge wire for speakers, 12- or 14-gauge for subwoofers. Speaker-level signals are not very prone to picking up interference, so it's okay to run your speaker wires near power cables. You'll have to run each wire for your door speakers through the rubber gasket or boot around the hinge, to protect the wires from the weather or from getting pinched in the door. There may be a Molex plug or a similar obstruction blocking the way, but you can usually find a place to drill a hole through it big enough to fit your wire through. Cut the factory speaker wires and connect the new wires directly to each speaker terminal.
It is important that you keep the polarity of your speaker wiring straight. This means that each positive terminal of the amp connects to a positive terminal of a speaker — and the same goes for the negative wiring. This ensures that your speakers will operate in mechanical phase — all the speaker cones moving the same direction with the same kind of signal — and will sound balanced when playing together. The positive and negative terminals of each speaker should be labeled, but if not, the positive terminal will usually be wider than the negative terminal.
Another and possibly more convenient way to send the powered signal from the amp to your speakers is to run the speaker wires to the harness that’s behind your receiver, where all your car’s speaker connections are accessible in one place. You cut each speaker wire from the receiver's harness and reconnect it to a speaker wire coming from the amp. Then, the signal can flow from the amp to the speakers by way of the vehicle's original factory wiring. This technique will work fine in systems with under 75 watts RMS of power per channel — but for more powerful systems it would be better to run new speaker wire directly from the amp to each speaker.
Firing it up
10. Check all of your wiring, from the battery and receiver to the amp and speakers, making sure every connection is tight and secure with no stray wire strands laying out that could cause a short circuit. Especially, check that the ground connection is tight and secure. Set all the amplifier's gains to minimum, and turn off all the filters and any bass boost or EQ it may have. See that the main fuse is properly installed in its holder. Then, reconnect your car's negative battery cable.
Turn on your car, then turn on the radio. Verify that the amplifier powered up (there'll be an indicator light on it somewhere). Play some music and turn the volume up just loud enough to hear. Now verify that sound is coming from each speaker and/or sub in your system. If everything sounds right, you can finish re-installing the receiver and all your vehicle's paneling, and then move ahead to step 11.
Troubleshooting
Factory radios and their security codes
- If you're using a factory radio, it may need its anti-theft security code reset. If so, you can usually find the code and resetting procedure in the vehicle's owner's manual, online, or from a car dealership service department (be prepared to prove you own the vehicle).
Amplifier doesn't power-up
- Check the main power wire fuse.
- Check the fuses on the amp.
- Ensure that the ground cable is connected tightly to an unpainted part of the vehicle's metal chassis.
- Test the remote turn-on lead.
- Remove the main power wire fuse
- Disconnect the remote turn-on lead from the amp.
- Connect a short jumper wire between the remote turn-on terminal on the amp and the 12-volt power terminal, leaving the main power cable connected.
- Replace the fuse. If the amp turns on, it means the remote lead is either broken or not connected correctly. Turn off the system, remove the jumper, and repair the remote lead.
- If the jumper didn't work, you'll need to measure the voltage between the amp's ground and both the positive power terminal and the remote terminal with a multimeter or voltmeter. Turn off the system, re-connect the remote lead to the amp, turn the system back on, and make the measurements. If it reads around +12 volts at both spots, there may be something wrong with the amplifier, and you should return it to your dealer for repair. If you don't read +12 volts at the amp terminals, you'll have to continue to inspect and repair the power and ground connections.
Amplifier comes on but no sound comes from the speakers
- Try turning up the amplifier's gain a little. Make sure all its filters are off or deactivated.
- Check your source. Make sure it's really playing music and not idling. If, for example, only some speakers aren't playing but others are, it may be that the receiver's fade or balance control isn't set to the middle. Some receivers have a mute function — you'll want to check on that, too. Make sure the RCA cables are plugged in properly.
- Turn the receiver and amp off. Unplug all the RCA cables from the receiver. Turn the receiver and amp back on. Now, touch the inner pin of one of the RCA plugs with a finger. If the wiring is good, you will hear a soft hum coming from a speaker. Test all the RCA cables this way. If all the speakers hum, it means the receiver's not putting out signal and may need to be looked at by a service technician. Or, if you're using a line output converter, it's not hooked up right. If you hear no humming on any channel, turn off the receiver and amp and plug the RCAs back in.
- With the receiver and amp off, unplug the RCA cables from the amplifier's input jacks. Get a short RCA cable that you know is good and plug it into the amp's input. Turn the receiver and amp on. Touch the inner pin of the RCA plug at the free end of the cable, and listen for a hum. Test all the amplifier's channels this way. If every channel hums, it means the RCA cables from the receiver are bad and need to be replaced. If you hear no humming, turn off the system and re-connect the patch cables to the amp inputs. (Another, better, way to perform this test is to plug a portable music player or phone directly to the amp's inputs with a mini-to-RCA adapter from the headphone jack, and play music through the amp.)
- Check the speaker wiring. No part of your speaker wiring should touch any part of your vehicle's metal body — that's a short circuit that could damage your amp and speakers. Another place to look for short circuits is at the amplifier's speaker terminals. It's very common to find a strand or two of stray wiring touching another wire, causing none of the speakers to work (the amp has sensed a short and shut down).
- Disconnect the speaker wires from the amp. Take a battery, 9 volts or less, and momentarily touch its poles to the positive and negative wires of a speaker. If the wires and speaker are good, you will hear the speaker click. Test all the speakers this way. If all the speakers click, it means the amplifier has a problem and probably needs to go in for servicing. If the speakers didn't click, you'll need to repeat this battery test at each speaker to determine whether the wire or the speaker itself needs to be repaired or replaced.
Noise: humming, buzzing, or whining
- The vast majority of noise problems are caused by bad grounding. If your ground point is free of dirt and paint and making a good connection to your vehicle's frame, try moving the ground to a different spot and see if that clears it up.
- Actually, any loose wire throughout your car could cause noise, even your battery terminals. Low battery fluid can also be a source of system-wide noise.
- The case of your amplifier making contact with your vehicle's metal body could cause noise. Any part of the signal system's negative wiring or shielding that touches the car's metal body could cause noise.
- See How to Diagnose and Suppress Noise for more tips on fixing noise problems.
 Setting the gain
Setting the amp's gain
11. Setting your amplifier's gain, or input sensitivity, matches the amp's input level with the receiver's output level, resulting in maximum distortion-free music and minimum background noise.
- Start with all the receiver's tone controls, EQ, and presets set to flat. Make sure the amp's gain is turned all the way down and all its filters are off. Play a familiar song.
- Turn up the receiver's volume until you hear something distort in the music — usually vocals begin to sound thin and scratchy, and drums start to crackle — then turn it down until it sounds good again. You might have to turn the amp gain up a little bit in order to hear it better. If you don't hear any distortion, even when the volume's turned up all the way, set the receiver's volume to three-quarters full. Now, turn up the amp's gain until you hear the music distort, and back it off until it's clean again. If you still don't hear any distortion, just set it for as loud as you can stand it. Then, you can turn the receiver volume down to a more comfortable listening level.
- The receiver's and amp’s EQ and crossover filters need to be set to where they normally would be when you play music. This is so the gain will be set under real-world conditions. Adding boost, for instance, at any frequency, after setting the gain can make the amp clip, distorting the sound and endangering speakers and subs. So, set the receiver's EQ, tone controls, bass boost, or presets to achieve the tonality you like in your music.
- Engage and adjust your amplifier's high-pass filters to keep bass notes from distorting through full-range speakers. Engage and adjust a sub amp's low-pass filter to keep high notes from muddying a subwoofer's bass. If you want to use your sub amp's bass boost, engage and adjust it for tone now.
- Repeat the gain-setting procedure. First, turn the amp gain down a bit. Turn up the receiver's volume until you hear something distort in the music, then turn it down until it sounds good again. If you don't hear any distortion, even when the volume's turned up all the way, set the receiver's volume to three-quarters full. Then, turn up the amp's gain until you hear the music distort, and back it off until it's clean again. If you still don't hear any distortion, just set it for as loud as you can stand it. Then, you can turn the receiver volume down to a more comfortable listening level.
Enjoy your new system.
Multi-amp installations
When powering multiple amplifiers, you run a single heavy-gauge power cable from your battery to a distribution block, and then connect a lighter-gauge cable from the block to each amp. This arrangement minimizes potential noise problems and keeps your installation looking neat. Make sure the main power cable is thick enough that it can handle the additional current draw of any amps that you might add in the future.
A good way to ground multiple components is to use a distribution block to organize the various ground cables into one larger cable that attaches to your vehicle's metal body. If that's not an option, try to ground all your gear to the same bolt.
If you have three or more components in your system that need remote turn-on leads, you may need a relay to protect your receiver. That's because the receiver's turn-on circuit can only supply a limited amount of current. If the components in your stereo system ask for more current than the receiver can supply, you can burn out that circuit in your receiver. You wire a relay so that the receiver triggers the relay to engage, while the turn-on signal comes from another source, like the fusebox, for instance.
A problem you may encounter
We have assumed you have picked equipment that your car's electrical system can handle. It would be wildly inappropriate, for example, to try to run 5,000 watts RMS worth of amplifiers in a compact car with a small-capacity alternator. Such a system would quickly bog down the car's system and eventually burn out the alternator. Some people, especially competitors, upgrade their alternators to accommodate their high-power systems.
The symptoms of over-powering include the dimming of lights when bass notes hit. If your lights dim just a little during heavy bass passages, you might benefit by installing a capacitor on the bass amp's power cable. Otherwise, check out Headlights Dim When the Music Plays to help solve over-powering issues.
Source: Crutchfiled